Natural Dye Variation: A Visual

Last year, I set out to use natural dye to create eight different colors for a quilt I was working on. After, I marked the variety of color in a photograph by writing the dye goods used for each color. I have returned to this photograph on several occasions to remember how this was achieved. It's funny all the things in life we swear we will not forget that slip away. I have been so happy to have this visual aid of various dye colors from plants, pictured below.

Ten months later, after several more natural dye sessions, I happened upon a large amount of white fabric perfect for dyeing. After a garage sale at a textile center, I came home with roughly 10 yards of dye fabric in a combination of linen and cotton. I love when I can salvage high-quality fabric for dyeing that will no longer go to waste. The dye process is a wonderful way to keep fabric out of landfills and transform a plain white fabric into something unique and beautiful.
Below, I offer a visual guide to producing a variety of colors from various dye goods. There are three ways I have achieved variation through the same dye bath: different fabric, multiple dye baths, and adding Iron as an after-bath mordant. As you will see, linen tends to produce a stronger color, the second dye bath produces a lighter color than the first, and Iron tends to darken the color.
Natural dyeing is an imperfect science, and I have not been specific enough to achieve these exact colors again. The amount of time, water to dye good ratio, type of water, and process all affect the color. I happen to find this part of the allure and magic of natural dye. So, use these visuals below as informative, but understand different hues may be achieved each time.
This visual blog does not offer great advice for beginners. However, if you want to get started with dyeing, you can download this helpful infographic for free outlining the 5 Simple Steps to Natural Dyeing.


This was the first time I used Iron with avocado dye. Next time, removing the fabric sooner form the dye bath may produce a lighter color closer to purplish/grey, I hope.

Onion skins also create a lovely green. I find I use the fabrics from onion skins very often as mixers as they blend well with many colors.
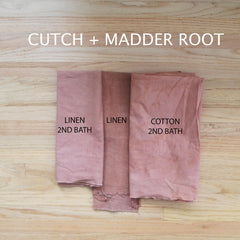
While Cutch is often closer to a warm brown, I chose to mix it with my Madder root bath to create more of a reddish/brown.

Take these results lightly. I often see much darker hues from Madder root, but I have never been satisfied with my results.

Goldenrod is a favorite of mine because of its abundance in late summer as well as its ability to create an even color.

This is a good visual to understand why a second or third bath is worthwhile. The cotton fabric form the second bath is much lighter, but it will be a great fabric to mix with other more colorful hues. The variety achieved from one dye good is important in a collection.
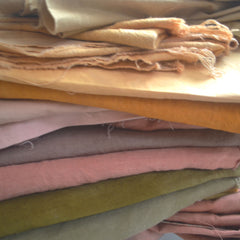
Mixed all together, these fabrics make a beautiful palette, don't you think? I can't wait to create with these. If you have never dyed before, you can follow my easy tutorial for dyeing with avocados HERE. This is a great place to start for simplicity. In the shop, there is also a collection for products which were made using natural dye. You can view all the products HERE.
As always, I love to hear your feedback. Drop your questions or comments below.
Happy Dyeing!